使用 Cloudflare Tunnel 访问 K3S 集群服务
在构建家庭实验室(homelab)时,一个常见的需求是希望能够从互联网访问自家的服务。但现在,许多家庭宽带分配的 IP 实际上是网络运营商的局域网 IP,使得外部网络无法进行访问。在过去,我试过使用花生壳,frp 等工具进行内网穿透,但最后都放弃了。这些工具的缺点在于,要么其免费额度限制过多,要么需要自己额外搭建中转服务。在过去的一年中,我主要使用的解决方案是 Cloudflare Tunnel,它免费、配置简单,而且提供的带宽基本能达到我宽带的最大上行带宽,Cloudflare 不愧是业界良心。
本文并非详细介绍 Cloudflare Tunnel 的教程,这样的教程可在官方文档中查询。这篇文章的主要记录我如何使用 Cloudflare Tunnel 访问内网的 K3S 集群服务,因此,你需要拥有一个 K3S 集群,并且对 K8S 相关概念有所了解。如果你需要了解如何构建一个 K3S 集群,可以参阅我之前的文章:在 Oracle Cloud 和家庭网络之间使用 K3S 和 Tailscale 构建 Kubernetes 集群。
在集群里配置 Cloudflare Tunnel 的优点在于它可以直接访问集群内的服务以及局域网内的其他服务。相比于使用 systemd(Linux)或 launchd(Mac)等传统运行系统服务的方式,它提供了更大的灵活性。例如,我可以设置运行 Cloudflare 的副本数量为 2,并分布在两个节点上。这样,即使一个节点出现故障,另一个节点上的 tunnel 仍然可以使用,实现了一定程度的高可用性。
Cloudflare Tunnel 的工作原理
-
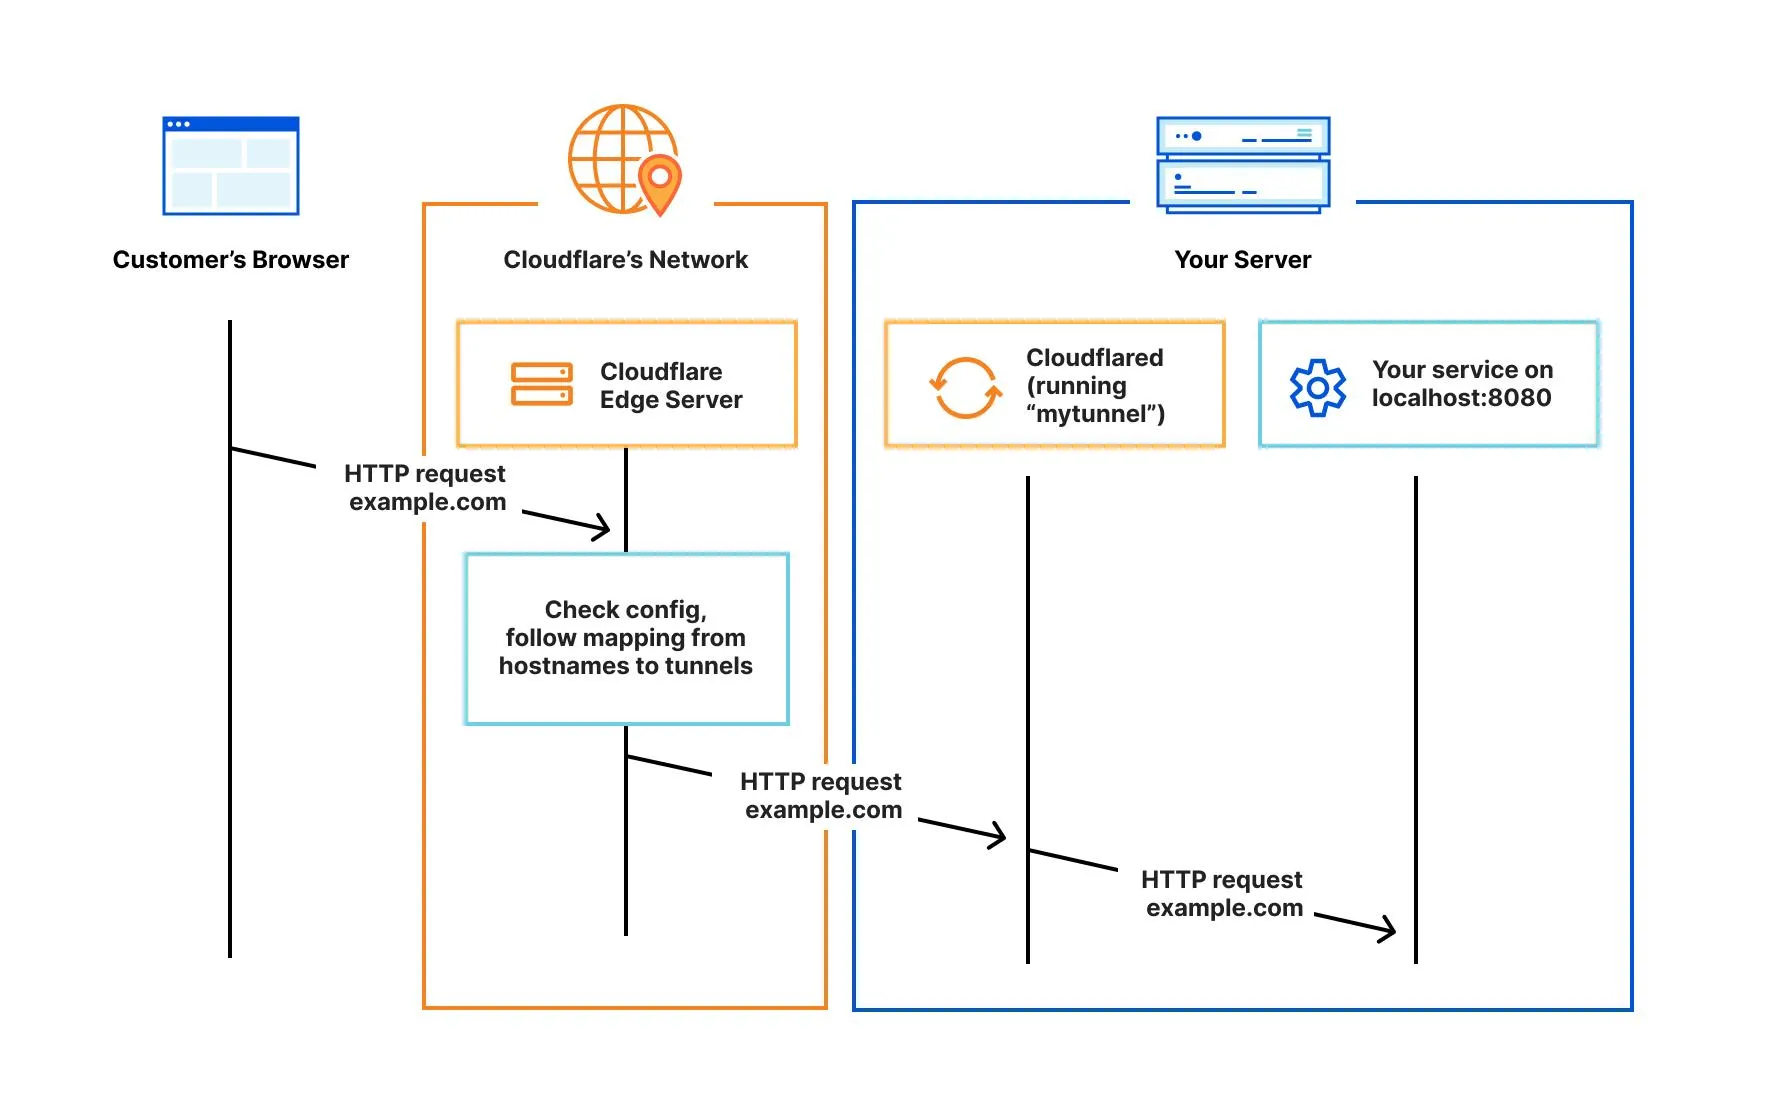
为了使用 Cloudflare Tunnel,你首先需要将提供的外部服务的域名交由 Cloudflare 进行解析。这样,当互联网用户试图访问你的域名时,DNS 会将流量引导至 Cloudflare。
-
接下来,你需要在内部网络中运行一个名为 Cloudflared 的服务,其主要功能是创建并维持一条与 Cloudflare 的通道。这条通道内部设有一套路由规则,确保不同域名的请求可以通过此通道被分流至不同的内部服务。
-
最后,我们回到第一步,当互联网用户通过 Cloudflare 访问你的域名时,Cloudflare 的网络就能依照第二步的设定,通过指定的通道请求并获取数据。
以下这张来自官网的图片很好的说明了它的工作原理:
知道了原理再进行实践,很多操作就不会变得过于抽象了。接下来开始具体的操作步骤。
注册 Cloudflare Tunnel
要创建 Cloudflare Tunnel,你需要先下载 Cloudflared。对于 Mac 用户,你可以使用 brew 进行安装:
brew install cloudflare/cloudflare/cloudflared输入以下命令后会得到一个链接,你只需要在浏览器中打开这个链接,然后登录到 Cloudflare:
cloudflared tunnel login接下来,你需要告诉 Cloudflare 创建一条新的通道:
❯ cloudflared tunnel create homelabTunnel credentials written to /Users/xxx/.cloudflared/033ab7ee-b166-475b-b9a3-d2423433206b.json. cloudflared chose this file based on where your origin certificate was found. Keep this file secret. To revoke these credentials, delete the tunnel.
Created tunnel test with id 033ab7ee-b166-475b-b9a3-d2423433206b
“homelab”是我为通道命名的,你可以根据自己的喜好命名。在同一个局域网环境下,一条通道就足够了,你无需为每个服务创建额外的通道。
同时,Cloudflare 会创建一个 UUID 格式的 json 文件。这个文件名就是通道的 ID,里面包含了该通道的授权信息。
在集群内运行 Cloudflared
通过注册 Cloudflare Tunnel,我们获取了一条通道的授权信息。现在,我们需要将这个授权信息以 secret 的形式写入 K3S 集群。
具体操作如下:
kubectl create secret generic tunnel-credentials \--from-file=credentials.json=/Users/xxx/.cloudflared/033ab7ee-b166-475b-b9a3-d2423433206b.json你需要将 /Users/xxx/.cloudflared/033ab7ee-b166-475b-b9a3-d2423433206b.json 替换为你在执行 cloudflared tunnel create 后生成的路径地址。
接下来,你需要生成一个 Cloudflared 的配置文件。这个配置文件会告诉 Cloudflared 相关的通道授权信息和路由规则。我将其命名为 00-configmap.yaml,内容如下:
---# This ConfigMap is just a way to define the cloudflared config.yaml file in k8s.# It's useful to define it in k8s, rather than as a stand-alone .yaml file, because# this lets you use various k8s templating solutions (e.g. Helm charts) to# parameterize your config, instead of just using string literals.apiVersion: v1kind: ConfigMapmetadata: name: cloudflareddata: config.yaml: | # Name of the tunnel you want to run tunnel: 033ab7ee-b166-475b-b9a3-d2423433206b credentials-file: /etc/cloudflared/creds/033ab7ee-b166-475b-b9a3-d2423433206b.json # Serves the metrics server under /metrics and the readiness server under /ready metrics: 0.0.0.0:2000 # Autoupdates applied in a k8s pod will be lost when the pod is removed or restarted, so # autoupdate doesn't make sense in Kubernetes. However, outside of Kubernetes, we strongly # recommend using autoupdate. no-autoupdate: true # The `ingress` block tells cloudflared which local service to route incoming # requests to. For more about ingress rules, see # https://developers.cloudflare.com/cloudflare-one/connections/connect-apps/configuration/ingress # # Remember, these rules route traffic from cloudflared to a local service. To route traffic # from the internet to cloudflared, run `cloudflared tunnel route dns <tunnel> <hostname>`. # E.g. `cloudflared tunnel route dns example-tunnel tunnel.example.com`. ingress: # The first rule proxies traffic to the httpbin sample Service defined in app.yaml - hostname: uptime-home.tomyail.com service: http://uptime-kuma:80 - hostname: music.tomyail.com service: http://music.music - hostname: jellyfin.tomyail.com service: http://192.168.50.232:8096 # This rule matches any traffic which didn't match a previous rule, and responds with HTTP 404. - service: http_status:404你需要将 tunnel 和 credentials-file 修改为指向你自己的 tunnel id。ingress 的规则是你希望在内网中对外暴露的服务,因此你需要根据实际情况进行调整。由于 Cloudflare 在集群内部运行,它可以访问局域网和集群内的所有服务。
对于局域网的服务,你只需直接指定 协议://ip:端口 的规则,例如,我在这里将 jellyfin.tomyail.com 设置为使用这种方式。对于集群内的服务,你需要按照 协议://服务名.<命名空间>:端口 的格式指定。如果省略了 命名空间,那么默认会使用 default namespace,就如同我在这里设置的 uptime-home.tomyail.com 一样。如果忽略了端口,那么默认会使用 80 端口,如我设置的 music.tomyail.com 所示。
接下来,我们需要声明一个 Deployment 以启动 Cloudflared
---apiVersion: apps/v1kind: Deploymentmetadata: name: cloudflaredspec: selector: matchLabels: app: cloudflared replicas: 2 # You could also consider elastic scaling for this deployment template: metadata: labels: app: cloudflared spec: containers: - name: cloudflared image: cloudflare/cloudflared args: - tunnel - --config - /etc/cloudflared/config/config.yaml # always using http2 instead of quic because quic is not working in my case - --protocol - http2 - run livenessProbe: httpGet: # Cloudflared has a /ready endpoint which returns 200 if and only if # it has an active connection to the edge. path: /ready port: 2000 failureThreshold: 1 initialDelaySeconds: 10 periodSeconds: 30 volumeMounts: - name: config mountPath: /etc/cloudflared/config readOnly: true # Each tunnel has an associated "credentials file" which authorizes machines # to run the tunnel. cloudflared will read this file from its local filesystem, # and it'll be stored in a k8s secret. - name: creds mountPath: /etc/cloudflared/creds readOnly: true volumes: - name: creds secret: # By default, the credentials file will be created under ~/.cloudflared/<tunnel ID>.json # when you run `cloudflared tunnel create`. You can move it into a secret by using: # ```sh # kubectl create secret generic tunnel-credentials \ # --from-file=credentials.json=/Users/yourusername/.cloudflared/<tunnel ID>.json # ``` secretName: tunnel-credentials # Create a config.yaml file from the ConfigMap below. - name: config configMap: name: cloudflared items: - key: config.yaml path: config.yaml最后应用相关的修改:
kubectl apply -f 00-configmap.yaml -f 01-cloudflared.yaml生效后,你需要登录到 Cloudflared 后台,为刚刚的主机创建 CNAME 规则。以 music.tomyail.com 为例,设置应类似于这样:
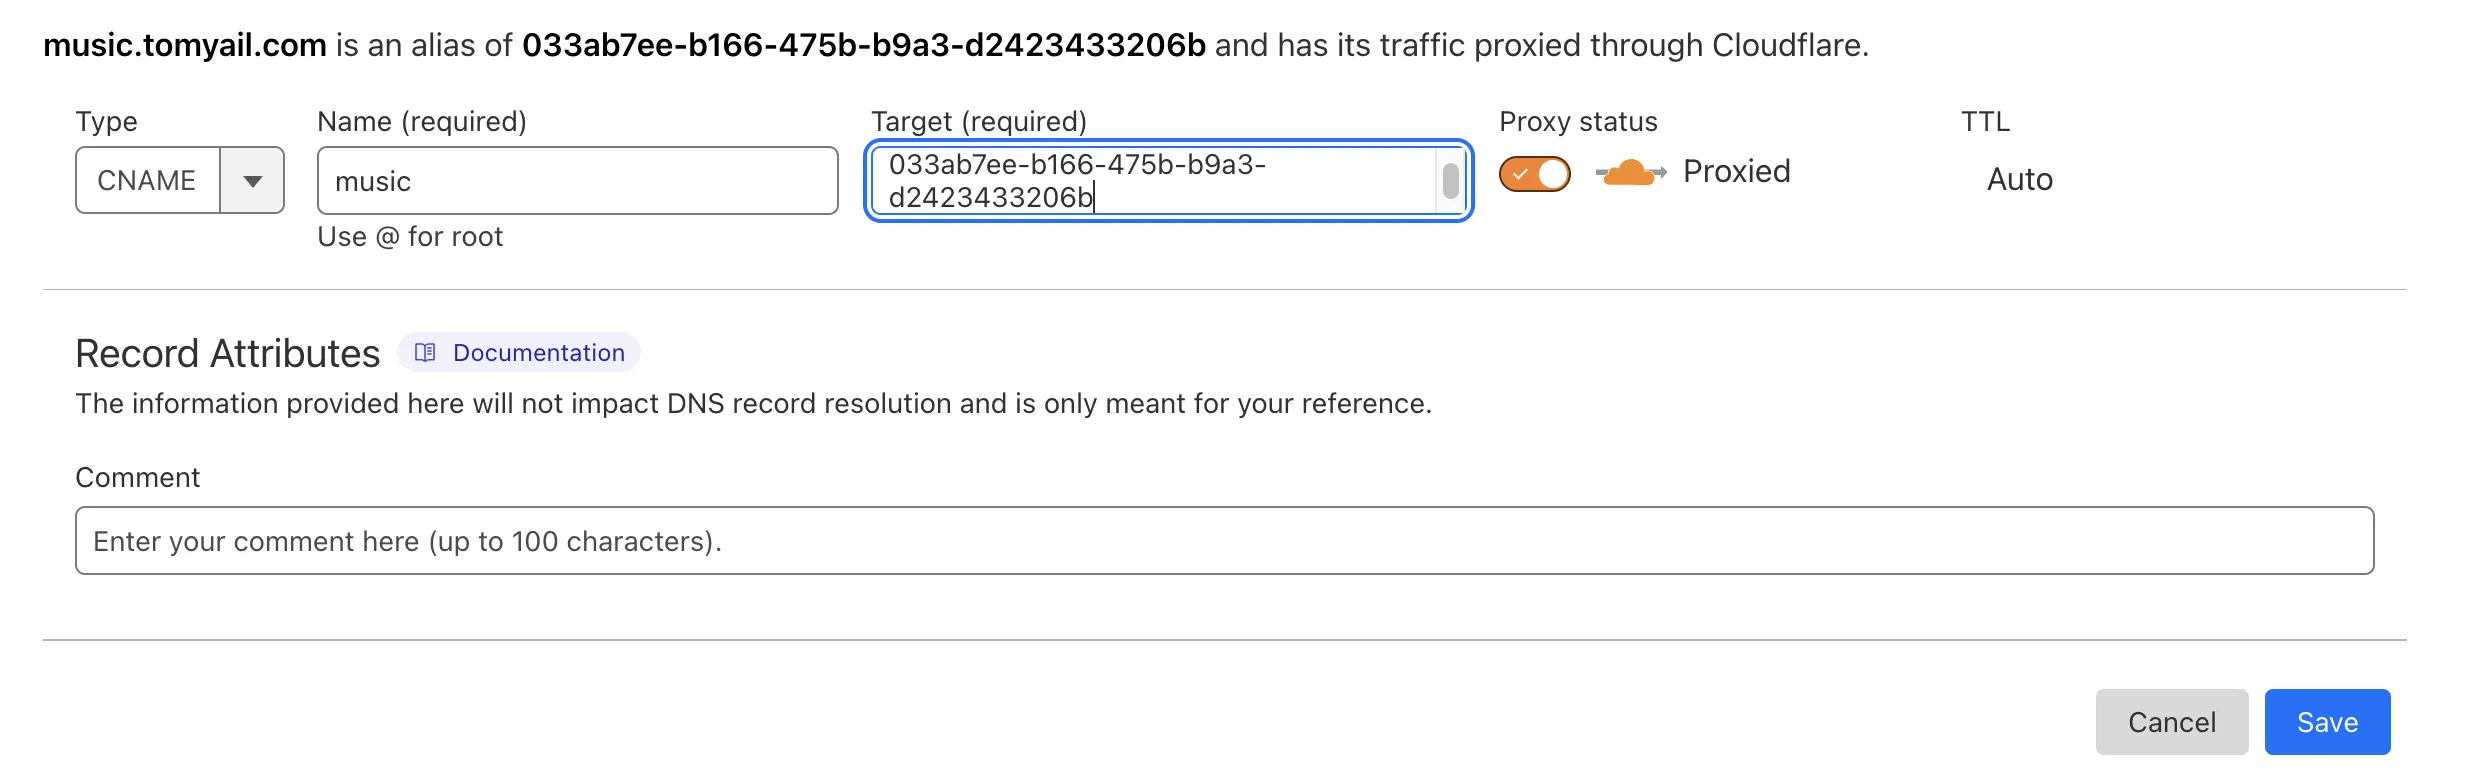
注意,target 应设置为 tunnel 的 id,同时必须勾选 proxy。
至此,如果一切顺利,你的内网服务应该已经可以通过互联网访问了。但请记住,一定要为内网服务设置强密码以防止内网数据被暴露。
更新规则
每次新增 ingress 规则,你都需要修改 00-configmap.yaml 配置文件然后执行
kubectl apply -f 00-configmap.yamlDeployment 并不会随着 configmap 自动更新,你需要手动重启相关的 pod 好让 Cloudflared 加载最新的配置。
之后进入 Cloudflare 新增一条 CNAME。
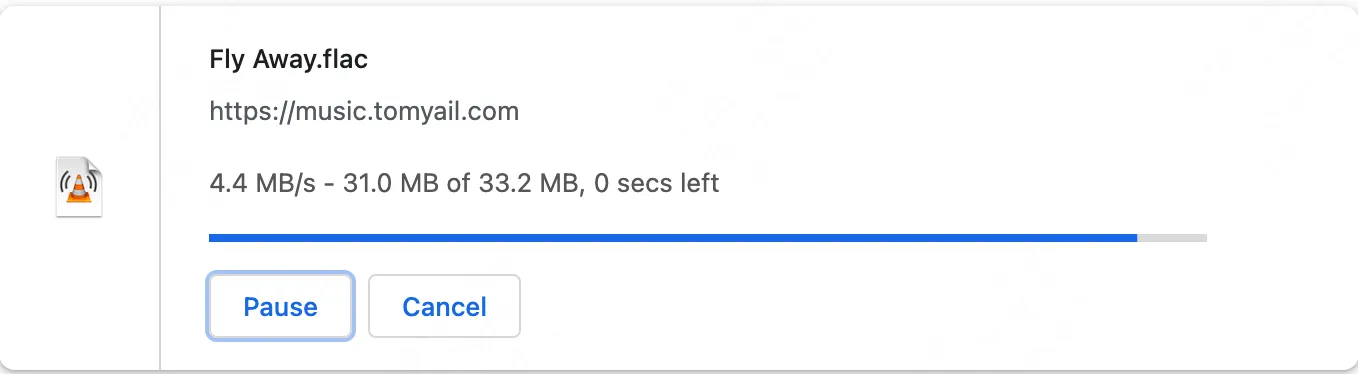
最终效果
直连 Cloudflare 没测试过,因为家里所有的设备都会经过主路由,主路由配置了 openclash,而我给 Cloudflare 的服务器 *.v2.argotunnel.com 都配置了代理。代理 vps 是搬瓦工的,速度还行,下载速度如下图: